Monday, 3 January 2011

Christmas Tree addition and subtraction

Counting activities involving counting have been a firm favourite previously in a moment of inspiration I came up with this idea to use up a few scraps of green card. Initially I was going to write the numbers on the trees but instead did addition sums/ number sentences what ever you call them, knowing that this would be a very visual way of introducing the written concept of something that has been worked on verbally many times. I wrote the answers on trunks to match up to the correct tree once the decorations had been added and the answer had been established.
As requested by a little mathematician I put the corresponding subtraction sum on the back of each tree.
Pieces were stored in a little tray with small pieces contained in an empty Branston pickle and cheese snack pot. The counting decorations were mini craft gems and sequins (without sticky backs)


The activity was a real hit and so good for fine motor control, counting those tiny gems on to the trees which had a terrible incline to slip rather frustratingly at times. We ended up doing on a try in the end as carpet made the trees quite wobbly, I think I would use thicker card, laminate or use felt if I were to do it again.

Remember, learning should always be tailored to the individual needs of the child. Addition and subtraction should not be attempted until the child is confident in counting with one to one correspondence, has lots of experience or dealing with numbers in everyday activity, has experience of language such as one more, lots more, take one away etc. in everyday activities and through songs. The child can then begin to deal with problems in play and everyday activity e.g. "We've eaten two biscuits how many are left?" Only when a child is confident with such "problems" can addition and subtraction in this way even be contemplated.

For a printable version of this activity go to TES simply register for free and you can down load for free http://www.tes.co.uk/teaching-resource/Christmas-Tree-Addition-6066768/requestAction/update/


Sunday, 2 January 2011

Doll making project part 2

Add the hair using a wool of your choice, thread through a wide eyed needle and and sew in the pattern identified below. The closer the stitches are together the fuller the head of hair. Remember to leave the strands of hair the length or longer than the hair you wish. Once you have sewn the hair on or as you change wool tie each length on yarn creating a knot at the "root" in the pattern identified below, green tied to red, red to blue, blue to yellow etc. To create a fuller head of hair add another layer under the top layer.
Note the plaits holding the hair back, these were created by adding three long strands of wool either side of the head and plaiting them. Then bringing them to the back of the head and tying together at the nape of the neck, un-plait the wool below the knot and cut the excess hair to make the wool the same length as the rest.
Sew eyes and a mouth in chosen colour.
At this point you need to unwrap or cut the tightly wound thread around neck and replace with another piece this time tying at the beginning, creating an neck that is the appropriate width for you doll, wind round at least five times and tie at end too. I added a fringe (bangs to americans) in the same way as the rest of her hair, i just felt she needed it. And added rosy cheeks using some blush applied with a finger (I then hair-spayed her face to make it adhere)

To create detail in the legs tie a knot in a length of thread cutting off the excess thread. Sew through knee just to the front of either side take needle back and forth through the knee several times through the same spot (ish). Tie a knot at the end and bring needle out though leg at another point cut thread very close to "skin" avoiding nicking the fabric, that way you will loose the loose thread.
I then made her a dress using an old pair of pyjamas, saving me a whole bunch of stitching by simply cutting the end of the leg off folding over the top and sewing with a loose running stitch 1cm approx.' from the top, pulling tightly to create a skirt. I then cut the elastic out of the top of the pyjamas and used this to thread though to create a more elasticated top. The top was a bit of a bodge up but basically a tabard. The flowers in her hair are lengths of gathered ribbon sewn into a ring and then sewn onto an elasticated hair tie, with a button in the middle.
Introducing the Princess, whether she will be the princess with the pea is another matter entirely.

Saturday, 1 January 2011

New Year Project (Part 1)


I've been wanting to make a Princess and the Pea play set for a long time now yesterday deciding to finally get to it, even purchasing a cute princess bag from accessorise to house the princess and her mattresses. But the thing is now I've made her I don't think I can bear to put her in a bag, think I'll have to make another princess maybe. So I am still at square one with the princess and pea project maybe sometime later in 2011.

Here are the basic stages of making the doll.
You will need: A pair of socks, stuffing, strong thread, needle, wool, the foot of a pair of tights.

Gather a ball of stuffing and create a very round ball, stuff inside the toe of a stocking/ tights, tie a knot in the tights at the bottom of the ball. To form a more realistic shaped head, as I am beginning here follow detailed instructions at the Silver Moon
Once the head is moulded in the stocking, stuff it into the toe of a sock wrapping cotton around the base of the head (do not tie, you will redo this later.) Cut the sock to the correct length to become the doll's body. Create two oval shaped spheres an appropriate size for feet, encasing into a piece of stocking fabric and tying it at the place the the ankle will be. Cut the foot off the other sock just before the bend of the heal. Cut this in half length ways. Turn theses pieces inside out and sew up the long edge, then turn the correct way.

Stuff the foot into the base of the tube you have just sewn, manipulating it to make the heal at the seam (this way it will create a realistic foot shape, due to the sock's shape. Stuff then leg with a generous sausage of stuffing. Sew up the opening, first folding the tops in a couple of mm to create a clean join. Attach the legs to the body by pinning them inside the join of the body (folding the edge of the fabric inwards about 2 mm to create a clean seam). Sew the edge up with legs joined using a fine blanket stitch.
Cut the remaining part of the sock used for the legs the correct length to create arms as in the diagram above. Arms of dolls seem to be a little shorter than realistic arms, they should come a tad below the join of the body to legs. Continue the process as for legs for arms, except create balls for hands.
Attach the arms to the body at the appropriate place.

Continued tomorrow....


Friday, 31 December 2010

Snow Transferring activities

Happy New year to all the readers, my resolution is to blog more frequently so am starting as I mean to go on. Who knows what weather chaos (or not) the new year will bring but whatever happens I'm sure there will be more snow and snowy weather calls for snowy activities, of the non cold variety. (Don't worry the window is not on fire)

Transferring seed pods (not sure what kind) painted White between containers, a shallow spoon was available but at point of photo was being used for something else, for fundamentalist montesorians among you, I'm so sorry!


Transferring White pom poms with a peg into a container with small hole. This actually proved quite tricky for little fingers as it was not a quick transferring activity, instead requiring a pause to for pushing the pom pom into the hole with a finger on the other hand. A great activity to encourage children to use both hands and to reach to midline.

Thursday, 30 December 2010

More Christmas Fine Motor activities

More Christmas fine motor activities, never have enough of these in the pre writing stage if you ask me.

Stamping with ink pad, was a popular activity to create christmas cards, but proved a little more difficult got little hands than I anticipated. I actually added a wooden coaster to the basket showing the children how they could place the stamp on paper, lay coaster on top and apply even pressure with both hands, this proved most successful.


Small bead threading with Christmas colours onto a pipe cleaner. Beads in a small tin to support fine finger muscle strength and manipulation. Initially created only as a fine motor activity but extended to creating patterns.

Father Christmas shaped tin with a large bell inside, initially designed as an infant activity for opening, getting bell out and replacing. But still accessed by the old children and does require a bit of skill opening the tin.

Christmas tag making, by far the most popular activity and I didn't get a photo! Every time I went to take the photo the resources were running out or ran out, and I never managed to get one made in action. I simply supplied old Christmas cards, a pair of scissors, a single hole puncher and curling ribbon. I showed the children the process of cutting their desired shape/ picture, punching two holes and threading the ribbon into one hole and out the other (few of the children can tie knots so I felt it best to focus on the creative process rather than teaching a new skill).

Whilst this was a hugely successful activity it proved challenging to follow the required sequence without support, I was tempted to add a picture instruction card but decided against it as felt it would reduce the problem solving/ thinking element. So by providing the occasional verbal prompt when requested or a reflected question e.g. "what do you think is next?" I was able to support to independence. If I was ever to make picture instructions I would do so in a three page book format that could be turned over to reveal the next stage of the sequence only if needed, rather than proving it to them "on a plate"

This is not a photo of my activity (far too perfect) but felt empty without a pic, so stole it from Crafting a Green World, which is a FABULOUS site full of green ideas, check it out.

Wednesday, 29 December 2010

Christmas Songs

Songs are an ever present part of Christmas from Slade to Ding Dong Merrily on high, and of course the cheesy children's classics. Here are a couple of songs that were on our shelves this years and have been particularly popular particularly the tree one, Snowmen were last year's favourite.

Twinkle Twinkle Christmas Star
(tune of Twinkle Twinkle)
Twinkle twinkle Christmas star
Wise men know what you are
Guided by your shining light
Helped them on there way at night
Twinkle twinkle Christmas star
Wise men know what you are.

or
Ten little Gold Stars
(tune of Ten Little Indians)
1 little, 2 little, 3 little gold stars,
4 little, 5 little, 6 little gold stars,
7 little, 8 little, 9 little gold stars
10 little gold stars for....(child's name)
Children taking it in turns to give them to their friends.
-----------------------------
Five Christmas Trees
(tune of Five Current Buns)

Five Christmas trees in the garden shop
Tall and spiky with a star on top
Along came.... (child's name)
With some money one day
Bought a Christmas tree and took it away

I purposefully made it "money" rather than penny in the hope that it would encourage children to say how much a tree would cost. My expectations were exceeded and we went as far as adding the right coins together and giving change some times we don't give children enough credit.
------------------------------------
Five little snowmen fat
Each had a funny hat
Out came the sun and Melted one
What a funny thing was that.

Four little...

I either get children to draw a sun on a piece of paper e.g. "Oh no, we haven't a sun we'd better make one quick" usually followed with "I will". Or provide them with a torch to shine it onto the chosen snowman, which is another great hand eye coordination exercise along with creating anticipation and encouraging visual tracking for other children.

Or

“I’m a little snowman, short and fat.

Here’s my carrot nose and here is my hat.

When it’s cold and icy I will stay,

But in the sun I melt away!”


Some wonderful Christmas son ideas are available at Perpetual Preschool

Tuesday, 28 December 2010

Christmas fine motor (hanging and transfering)

Ok, so always on the look out for ideas where children are encouraged to develop their fine motor skills whilst incorporating favoured schemas.

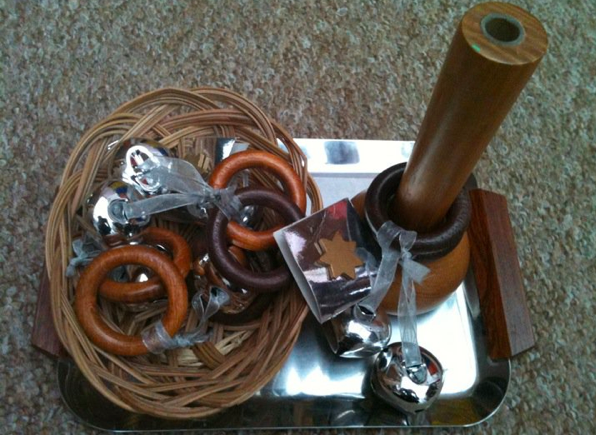
Bells from gift tags (complete with tags, how the survive is anyones guess) attached to small curtain rings and placed onto a wooden single stem vase. These can be used as a simple transferring activity or as often are in conjunction with a song jingle bells/ twinkle twinkle again needing a pincer grip rather than a palmer grasp as with many bell instruments

Decorative Christmas candle rings, placed onto a kitchen roll pole, another favourite. Just adapting the good old curtain rings on a pole. Make sure the decorations are safe for children you are working with.


Little wooden gift tags (of course you could use card ones short term) to hang from a cup tree. This requires a little more skill and usually requires the use of two hands and finger control to separate the thread to hang.

For a more complex activity and incorporating the enclosure schema (always a favourite) placing a large seleacion of christmas decorations and tags in a selection of boxes and bags, stored inside a larger box, creates a natural curiosity. Whilst incorporating even more fine motor skills, and then when it comes to putting it away (which is equally fun) a whole bunch of problem solving, numeracy and reasoning skills to match lids. Lots of opportunities to talk about a range of mathematical concepts e.g. size, prepositions, 3d/ 2d shape, colour, weight, pattern, sorting, comparisons etc. If you choose your decorations accordingly you can also discuss the christmas story (which was my initial motivation for the activity, just kept adding more decorations to meet demand)
Happy Fine motor Christmas.

"He who can no longer pause and wonder and stand rapt in awe, is as good as dead: his eyes are closed." Albert Einstein